How to Apply Rhinestone Transfers (Step-by-Step Guide)
Applying rhinestone transfers correctly is the key to achieving a professional, long-lasting result. Whether you are a beginner, a small business owner, or a clothing brand, understanding the right method will help you avoid common mistakes and ensure your designs stay secure, shiny, and durable.
In this guide, you will learn: the tools required, correct heat press settings, step-by-step application process, common mistakes to avoid, and pro tips for long-lasting rhinestone designs.
What You Need Before You Start
Before applying rhinestone transfers, make sure you have the correct tools and setup. Using the right equipment ensures better adhesion and consistent results.
- Heat press machine (recommended for best results)
- Rhinestone transfer design
- Garment (cotton, polyester, or blend)
- Teflon sheet or protective cover
- Flat working surface
Although household irons can be used, a heat press is strongly recommended for even pressure and temperature control.
Recommended Heat Press Settings
| Setting | Recommended Range |
|---|---|
| Temperature | 150°C – 170°C (300°F – 340°F) |
| Time | 10 – 15 seconds |
| Pressure | Medium to firm |
Always follow the specific instructions provided by your rhinestone transfer supplier, as materials may vary.
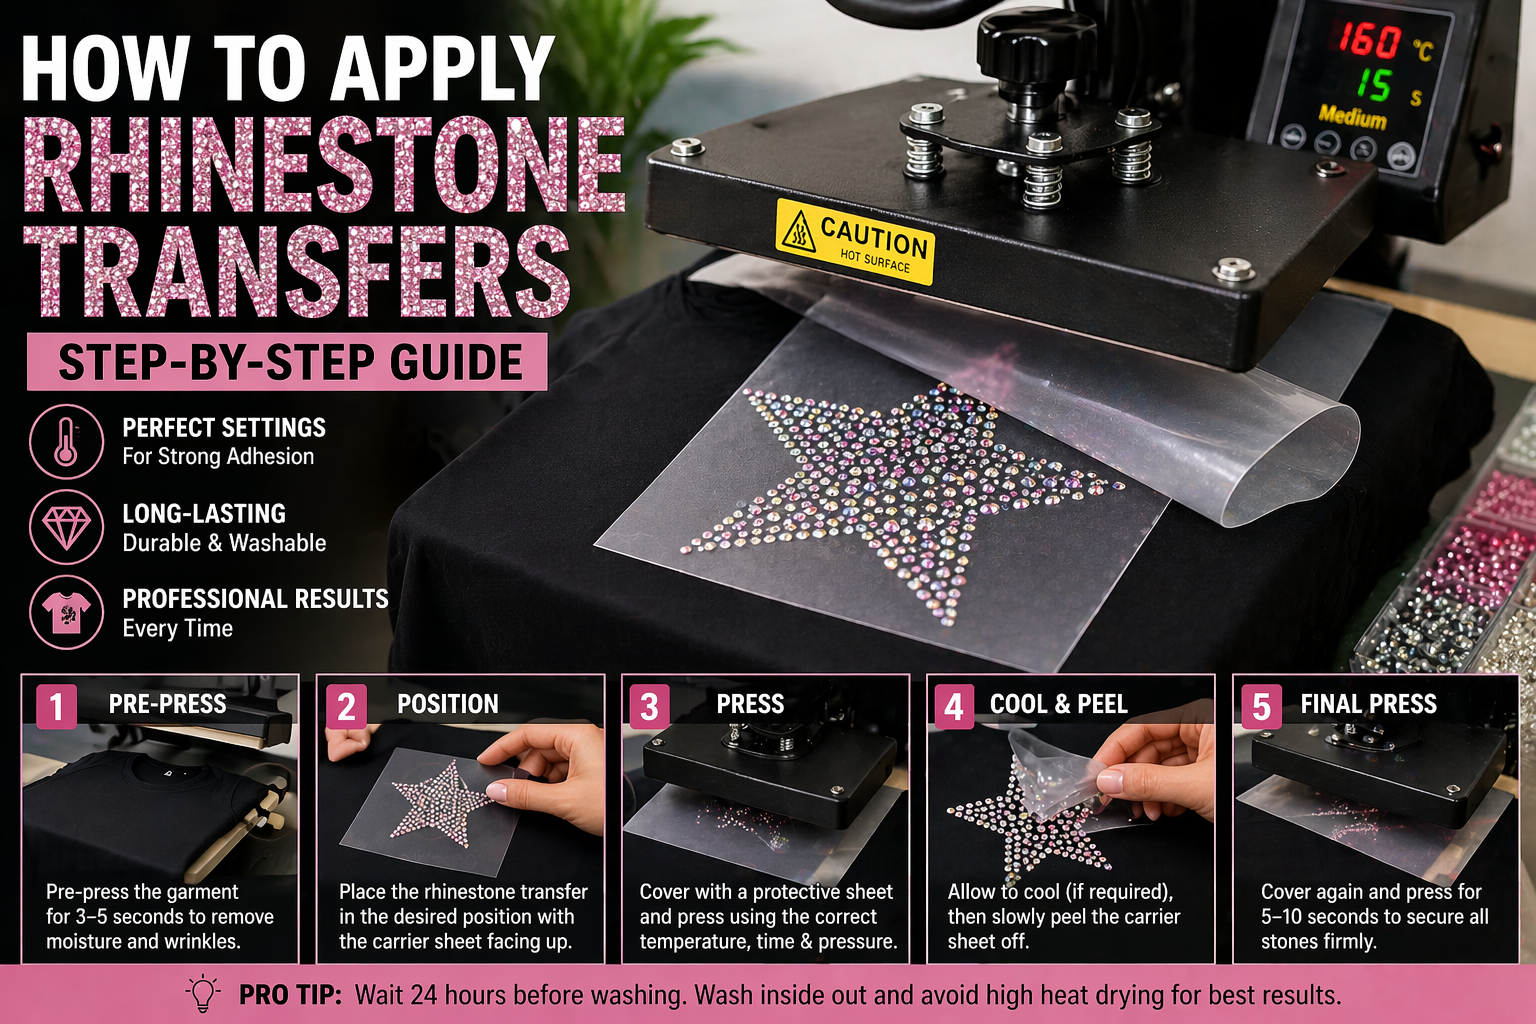
Step-by-Step Application Guide
Step 1: Pre-Press the Garment
Place the garment on the heat press and press it for 3–5 seconds. This removes moisture and wrinkles, ensuring better adhesion.
Step 2: Position the Transfer
Place the rhinestone transfer on the garment with the carrier sheet facing up. Make sure the design is aligned correctly before pressing.
Step 3: Apply Heat and Pressure
Cover the design with a Teflon sheet and press using the recommended temperature, time, and pressure. This activates the adhesive backing of the rhinestones.
Step 4: Cool and Peel
Allow the transfer to cool slightly if required, then slowly peel off the carrier sheet. If any stones lift, re-press for a few seconds.
Step 5: Final Press
Place the protective sheet over the design again and press for an additional 5–10 seconds to secure all rhinestones firmly.
Common Mistakes to Avoid
- Incorrect temperature: Too low prevents bonding, too high damages adhesive
- Insufficient pressure: Leads to stones falling off
- Peeling too early: Can cause incomplete transfer
- No pre-press: Moisture affects adhesion
- Skipping final press: Reduces durability
Pro Tips for Long-Lasting Results
- Always test on a sample garment first
- Use consistent pressure across the design
- Wait 24 hours before washing
- Wash garments inside out
- Avoid high heat drying
Can You Use an Iron Instead?
Yes, but results may vary. Household irons cannot provide consistent pressure like a heat press, which may lead to weaker adhesion. If using an iron, apply firm pressure and ensure even heat distribution.
Final Thoughts
Applying rhinestone transfers correctly ensures a professional finish and long-lasting durability. By following the right steps and avoiding common mistakes, you can achieve high-quality results whether for personal use or business production.
Need High-Quality Rhinestone Transfers?
Teebling provides premium rhinestone transfers with strong adhesion, consistent quality, and fast production for brands and businesses worldwide.
Get a Quote